Importing VMDKs (VMware Virtual Disks into ProxMox)

This process is not as bad was one would think it is. This guide will not cover how to export the OVF from esxi or vCenter. This guide will cover how to convert the vmdk that you have copied onto your ProxMox Node so that you can begin to convert the disk to a qcow2 and assign it to the VM you have created already.

Create a VM in ProxMox

To create a VM, login to your account by navigating to the URL of your server which would be https://x.x.x.x:8006 or https://fqdn.example.lab. Once you have successfully logged in, click on the node to start the process. I already created my VM, so the VM ID applies specifically to my setup.

In the Create: Virtual Machine dialogue box in your browser, you will configure the following tabs in order

  • General
  • OS
  • System
  • Disks
  • CPU
  • Memory
  • Network

Lastly, you will confirm these settings once done. At this point, you are ready to import your disk and attach it to the Virtual Machine you just created

General

When you click the node and create VM button, it will open a dialogue box for you to enter in the pertinent information for the creation of your virtual machine. There is an example screenshot right below. All you are doing is naming your Virtual Machine. In this example, I named in Test-Linux.
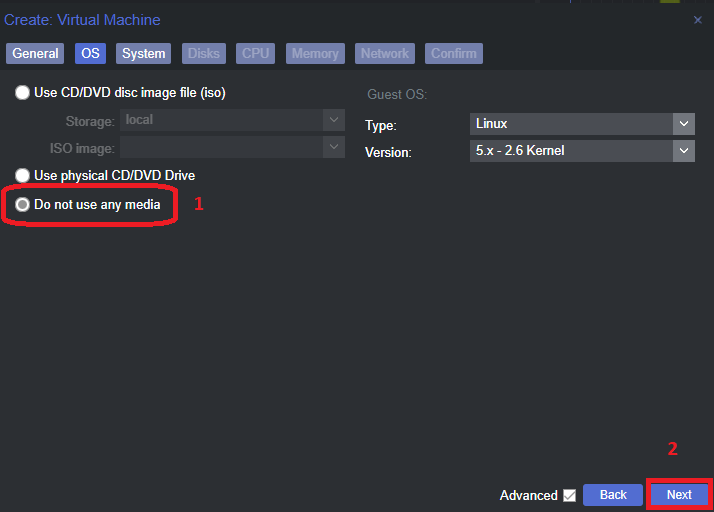
OS Tab

You will not be installing an OS because your importing a Virtual Machine that you exported from esxi or vCenter. So choose do not use any media and move to the System tab

System Tab

Skip right past this and go to the Disks Tab. Since we are importing a disk, we will delete the scsi0 disk and click next to move on the CPU, Memory, and Network tabs which are self-explanatory. You can assign what you want for virtual resources based on what your device has available.


Confirm and import the Disk

Once you confirm everything, you will see a new VM created under your datacenter with the VM ID form the general tab. This is important that you note that VM ID because this is where you are importing your disk to. My VM ID in this example is 100.


Steps to import the Disk

Ensure you place your OVF folder in a directory of your choosing on your ProxMox server node. You can scp the folder or use a program like WinSCP or SecureCRT. Do whatever method you want. Once you have it where you want it, make sure you are connected via ssh or console window in the directory your VMDK is located so you can run the command to import.

  • SSH / Console in
  • navigate to the directory of your VMDK file
  • run the importdisk command
    • example command: 
    • qm importdisk 100 name-of-disk.vmdk local-lvm --format qcow2

The imported disk will show you progress up to 100%. The disk will show up under your new virtual machine on the Hardware tab. 

  • Click on the disk and add it. Keep the default settings (working with windows VMs may not be as smooth

Boot Options

Once the disk has been added, you need to go to boot options and add it to the Boot Order or else it will not boot your hard drive. I leave the virtual CD ROM enabled, and I uncheck the network card because we are not PXE booting. After you do this, you are ready to boot it up. You can open up a console window to check the progress of booting up. That’s all there is to it!

Console Window

Windows VMs

Primarily, all the steps are the same with the exception of a few different steps. This can also apply to Linux VMs as well, but in the previous steps, my VM was created with legacy bios. My Domain Controller and Windows hosts are utilizing UEFI to boot, so we must edit the hardware on the Virtual Machine. In addition to this, I think the VM Console window using SPICE for the display is a much smoother console window than the default for Windows. If you are pulling up a Linux server which is command line only, then this is not really relevant or necessary. Ok, without further ado!


 Bios Settings

To make the necessary adjustment, select your Windows VM and go to the hardware section to change your bios to UEFI. Once you do that, you will go back to options and make sure that the virtual disk is in selected in the boot order like we did previously, and you should be good to go. Reference the below screenshot for assistance if needed.


If you have any questions, please comment below and hopefully I can be of assistance to you!

Leave a comment

Your email address will not be published. Required fields are marked *